Beginner Guide to Stud Finder: Easy Tips for Perfect Wall Mounts
Are you ready to tackle your next home project but unsure how to find the studs behind your walls? Knowing where studs are hidden is key to hanging shelves, mounting TVs, or securing heavy items safely.
A stud finder can be your best friend, but if you’ve never used one before, it might feel a bit confusing. Don’t worry—this beginner guide to stud finders will walk you through everything you need to know. By the end, you’ll have the confidence to locate studs quickly and accurately, making your DIY tasks easier and safer.
Keep reading to discover simple tips and tricks that will turn you into a stud-finding pro in no time!
.jpg)
Credit: www.pca.org
Types Of Stud Finders
Magnetic stud finders detect metal nails or screws inside walls. They are simple, affordable, and need no batteries. Just move the tool slowly across the wall until it sticks or beeps. They work best on walls with metal fasteners but may miss wooden studs without metal.
Electronic stud finders sense changes in wall density. They use sensors to find wooden or metal studs behind drywall. These devices are more accurate than magnetic types but need batteries. Hold the finder flat and move it slowly for the best result.
| Feature | Magnetic Stud Finder | Electronic Stud Finder |
|---|---|---|
| Power Source | None | Batteries |
| Detects | Metal nails/screws | Wood and metal studs |
| Cost | Low | Moderate to high |
| Ease of Use | Simple | Requires calibration |
Advanced features include stud depth detection, live wire warning, and LCD displays. Some models also detect pipes or metal objects behind walls. These extras help avoid accidents and improve accuracy. Choose features based on your needs and budget.

Credit: www.safetycompany.com
Preparing Your Wall
Start by clearing the surface of the wall. Remove any pictures, hooks, or decorations. Wipe the wall with a dry cloth to get rid of dust. A clean surface helps the stud finder work better.
Next, calibrate the stud finder. Place the device flat on the wall where no studs are expected. Turn it on and wait for the signal that shows calibration is complete. This step ensures accurate readings.
Move the stud finder slowly across the wall. Watch for signals or lights that show the edges of a stud. Mark these spots lightly with a pencil. Finding both edges helps confirm the stud’s exact location.
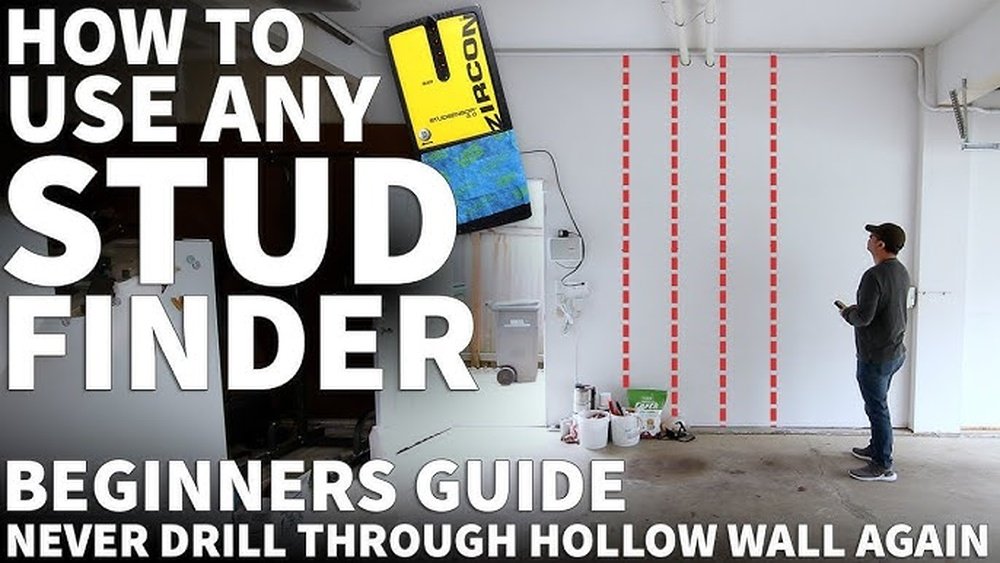
Locating Studs Step-by-step
Place the stud finder flat against the wall at about chest height. Hold it steady to get an accurate reading. Slowly slide the device horizontally across the wall surface. Watch the indicator carefully as it moves. When the device signals, mark that point lightly with a pencil.
Continue moving the finder past the first mark. Stop when the signal ends. Mark this second point too. These two marks show the stud edges. The space between is the stud width. Use these marks to know exactly where the stud lies behind the wall.
| Step | Action |
|---|---|
| 1 | Position the finder flat and steady on the wall. |
| 2 | Slide slowly until the device signals a stud. |
| 3 | Mark the first edge of the stud. |
| 4 | Keep moving until the signal stops. |
| 5 | Mark the second edge of the stud. |
Common Mistakes To Avoid
Calibration is key. Always calibrate your stud finder before use. Skipping this step can cause wrong readings. A poorly calibrated tool may show empty spots as studs.
Wide signals can be confusing. A very wide signal usually means the tool is detecting pipes or wires, not a stud. To avoid mistakes, scan slowly and mark edges carefully.
Stud spacing varies by building. Usually, studs are 16 or 24 inches apart. Ignoring this can lead to wrong spots and failed mounts. Knowing typical spacing helps find studs faster.
Tips For Accurate Wall Mounts
Marking stud locations helps keep your wall mounts straight and secure. Use a pencil to mark spots where the stud finder detects a stud. Mark both edges of the stud for better accuracy.
Using multiple scans improves stud detection. Scan the wall slowly from left to right. Repeat the scan a few times to confirm stud positions. This reduces mistakes caused by wall materials or wiring.
Checking for obstacles is important before drilling. Studs may hide pipes, wires, or insulation. Use a stud finder with a wire detector or look for clues like outlets and switches. Avoid drilling in these areas to stay safe.
Alternative Stud Finding Methods
A strong magnet can help find nails or screws in the wall. Move it slowly across the wall surface. When the magnet sticks or pulls, there is likely a stud behind. This method works best with metal fasteners.
Tap the wall gently with your knuckles or a small hammer. Listen carefully for a solid sound. Hollow spots make a light sound, while studs create a dull, firm sound. This technique takes practice and patience.
Studs are often placed near electrical outlets. Measure about 16 or 24 inches from the outlet’s edge along the wall. Mark these spots and check for firmness. This can give a good estimate of stud locations.
Stud Spacing By Building Type
Standard residential walls usually have studs spaced 16 or 24 inches apart. This spacing helps support the wall and anything attached to it. Most homes use 16-inch spacing because it is strong and works well with drywall sheets. Some newer homes use 24-inch spacing to save materials and cost.
Mobile homes and other variations often have different stud spacing. It can be less consistent and may vary from 12 to 24 inches. This happens because mobile homes are built with lighter materials and need flexible designs. Always check stud spacing carefully in these cases.
| Building Type | Typical Stud Spacing | Notes |
|---|---|---|
| Standard Residential Walls | 16 or 24 inches | Most common for strength and drywall fitting |
| Mobile Homes | 12 to 24 inches (variable) | Lighter build; spacing varies by design |

Credit: www.youtube.com
Choosing The Right Tools
Using the right tools makes mounting easier and safer. Complementary tools include a level to keep items straight and a tape measure for exact spacing. A pencil helps mark stud locations clearly. A power drill or screwdriver speeds up installation.
Safety is very important. Always wear safety goggles to protect your eyes from dust and debris. Gloves protect your hands from sharp edges or splinters. Use a dust mask if drilling creates dust. Good lighting helps avoid mistakes and accidents.
Frequently Asked Questions
How To Use A Stud Finder For Beginners?
Hold the stud finder flat against the wall. Slowly move it horizontally at your desired height. Wait for it to signal a stud. Mark the stud edges for accurate placement. Repeat to confirm stud width before drilling or nailing.
What Are Common Stud Finder Mistakes?
Common stud finder mistakes include not calibrating the device, ignoring stud edges, and mistaking pipes or wires for studs. Always calibrate first, scan slowly, and confirm both stud edges for accurate results. Avoid rushing to prevent false readings and ensure proper mounting.
What Is The Easiest Way To Find Studs?
The easiest way to find studs is by using a stud finder. Move it slowly across the wall until it signals a stud.
How Far Apart Are Studs In A 100 Year Old House?
Studs in a 100-year-old house are usually spaced 16 to 24 inches apart. Older homes may have irregular spacing. Always check with a stud finder for accuracy.
Conclusion
Using a stud finder makes wall projects safer and easier. Remember to calibrate the tool before use. Scan slowly and mark the edges of each stud. Practice helps you gain confidence and accuracy. With patience, you will avoid common mistakes.
This simple device saves time and prevents damage. Start small, and soon you’ll handle bigger tasks. Stud finders are helpful for any DIY enthusiast. Keep your walls secure by finding studs right.